

Let’s be honest, the last thing anyone wants to do after returning from a long trip is to deal with the massive line in customs.
You’ve frantically tried to get off the plane when the doors unlock; you’ve nearly sprinted through the airport to beat the rush and, yet, you’re met with a crowd so deep it takes you back to those nights spent in concert mosh pits.
What. A. Nightmare.
So, why not skip the hassle altogether? Now, with the Mobile Passport app, you can!
What Is the Mobile Passport app?
The Mobile Passport app allows U.S. citizens and Canadian visitors to expedite the customs process for entry into the United States. This free U.S. Customs and Border Protection approved app allows you to not only skip the regular customs line, but also the need to fill out customs paperwork upon arrival. Instead, everything is done on your device! Plus, the app can also assist you in renewing your passport as it approaching expiry.
And with availability on both Google Play and the Apple Store, anyone with a smartphone or tablet can use it!
While the free version will save you time, the paid version (Mobile Passport Plus with an annual fee of $14.99) will save you frustration. Mobile Passport Plus stores all downloaded passport information so there’s no need to re-input it every time you return to the United States. Pretty convenient for a nominal fee!
It’s important to note, however, that Mobile Passport does not replace your physical passport. Both are needed to get through customs.

Mobile Passport Locations
Mobile Passport is currently found at 3 seaports and 26 international airports across the United States. Those locations include:
- ATLANTA · Hartsfield-Jackson International Airport (ATL)
- BALTIMORE · Baltimore-Washington International Thurgood Marshall Airport (BWI)
- BOSTON · Boston Logan International Airport (BOS)
- CHICAGO · Chicago O’Hare International Airport (ORD)
- DALLAS · Dallas/Fort Worth International Airport (DFW)
- DENVER · Denver International Airport (DEN)
- FORT LAUDERDALE · Fort Lauderdale-Hollywood International Airport (FLL)
- FORT LAUDERDALE · Port Everglades (PEV)
- HOUSTON · George Bush Intercontinental Airport (IAH)
- HOUSTON · William P. Hobby International Airport (HOU)
- LOS ANGELES · Los Angeles International Airport (LAX)
- MIAMI · Miami International Airport (MIA)
- MIAMI · Miami Seaport
- MINNEAPOLIS · Minneapolis-Saint Paul International Airport (MSP)
- NEW YORK CITY · John F. Kennedy International Airport (JFK)
- NEWARK · Newark Liberty International Airport (EWR)
- ORLANDO · Orlando International Airport (MCO)
- PALM BEACH · Palm Beach Seaport (PBI)
- PHOENIX · Sky Harbor International Airport (PHX)
- PITTSBURGH · Pittsburgh International Airport (PIT)
- PORTLAND · Portland International Airport (PDX)
- RALEIGH · Raleigh-Durham International Airport (RDU)
- SACRAMENTO · Sacramento International Airport (SMF)
- SAN DIEGO · San Diego International Airport (SAN)
- SAN FRANCISCO · San Francisco International Airport (SFO)
- SAN JOSE · San Jose International Airport (SJC)
- SEATTLE · Seattle-Tacoma International Airport (SEA)
- TAMPA · Tampa International Airport (TPA)
- WASHINGTON, DC · Washington Dulles International Airport (IAD)

Easy Setup
The first thing you need to do after downloading the app is setup your passport. And, doing so couldn’t be easier! Simply scan the info page of your passport with your phone, and Mobile Passport automatically uploads all your details. Easy peasy!
Double check to make sure the information is correct. Then, take a photo of yourself facing forward, without smiling, and with your eyes open (similar to what you have on your physical passport).
And, that’s it!
You’re now ready to use the Mobile Passport app at participating customs locations.

Simple To Use
Using Mobile Passport to go through customs is a breeze. And, as I mentioned before, using the app not only saves you time but also allows you to skip filling out the paper forms upon arrival (bonus!)
Just follow five simple steps:
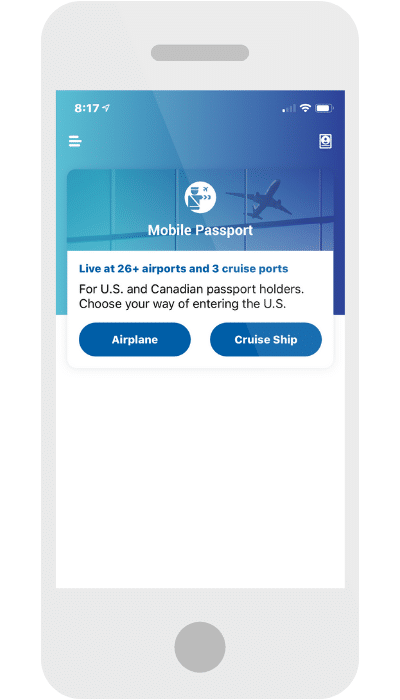
STEP 1: Select Your Method of Transportation
The first thing Mobile Passport will ask you is how you’re entering the United States – by airplane or cruise ship.
STEP 2: Specify Passengers and Travel Information
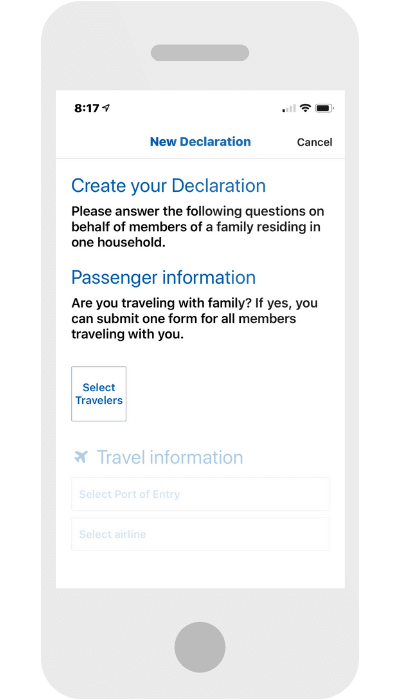
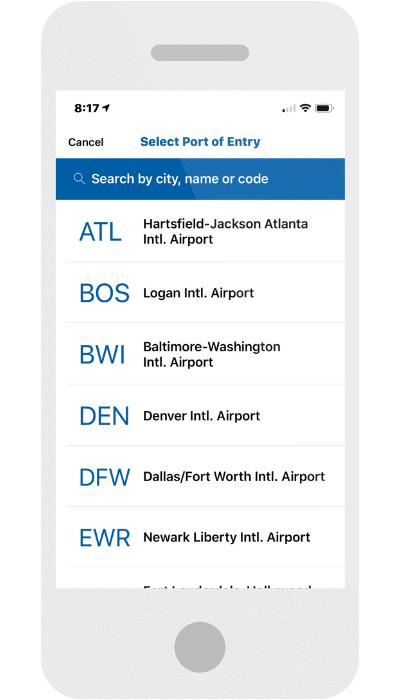
Next, create a new declaration by specifying which travelers are with you (multiple family members can be on the same declaration), your port of entry, and which airline or cruise company you’re coming in on.
STEP 3: Answer A Short Questionnaire
Then, after acknowledging the U.S. Customs and Border protection disclaimer, you move on to answering five quick yes-or-no questions. They are:
- Do I (we) have any commercial merchandise?
- Am I (are we) transporting currency or monetary instruments equal to or greater than $10,000 U.S., or foreign equivalent, in any form?
- Do I (we) have any articles to declare that were acquired abroad and are being brought into the United States in excess of the duty-free exemption? The duty-free exemption is normally $800 for U.S. residents and $200 for flight crew members.
- Do I (we) have any fruits, vegetables, plants, seeds, food, insects, meats or meat products, dairy products, disease agents, cell cultures, snails, soil; or have you visited a farm/ranch/pasture outside the United States?
- Have I (we) been close to (such as touching or handling) livestock outside the United States?
Once you complete the five questions, you’ll be sent to an overview page to review the information for accuracy before submitting your form.
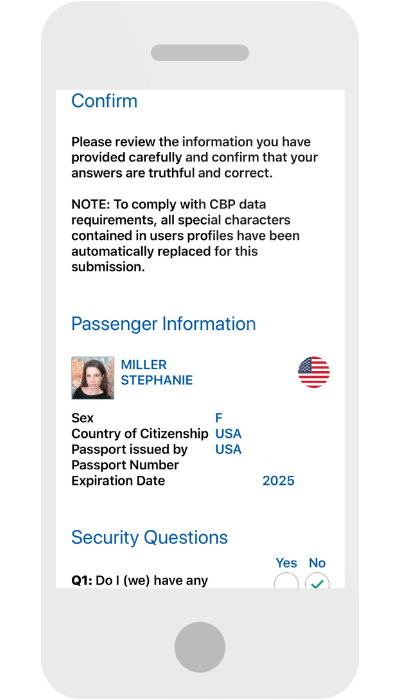
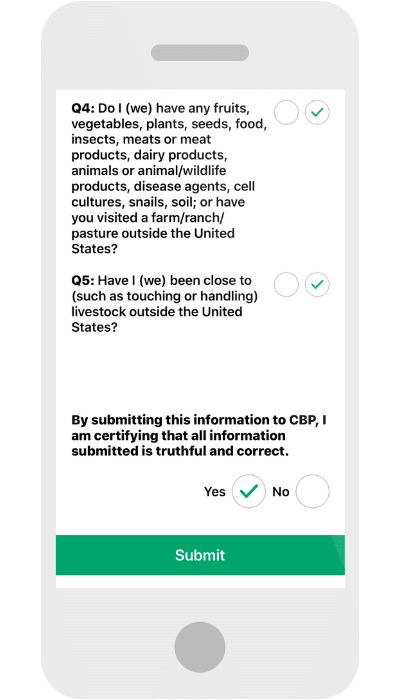
STEP 4: Get Your QR Code
Once you hit “Submit,” you’ll be asked if you’re ready to enter the United States. The Mobile Passport code is good for four hours after submission, so it’s best to wait until you reach your port of entry.
Personally, I like to fill mine out as the plane is taxiing to the gate. That way, I’m ready to go as soon as I enter the airport.
Upon completion, you’ll see a confirmation screen with traveler details and a QR code.
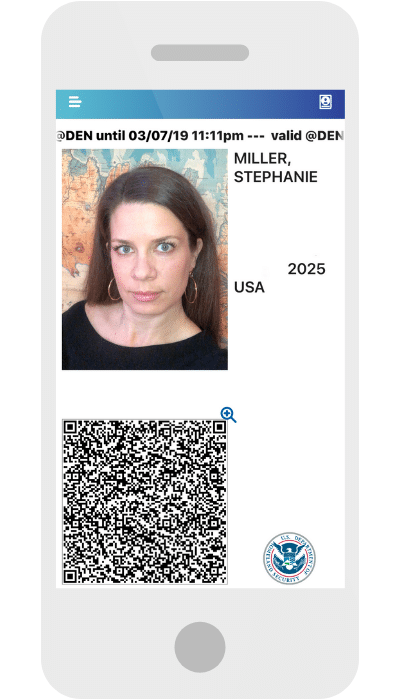
STEP 5: Head To The Mobile Passport Control Lane
Now that your declarations form is complete, you can head to the Mobile Passport Control lane. In many airports, this is the same area as Global Entry (and the line is almost non-existent. More often than not, when I go through the Mobile Passport Control lane I’m the only one there!)
Then, simply show the customs official your QR code and physical passport, answer any questions they may have, and just like that you’re back on U.S. soil!

While waiting in long lines can be a lot of fun (said no one ever), skipping them with the Mobile Passport app will forever change the way you travel.
So, grab your phone, download the app, and get ready to breeze through customs in mere minutes!
You May Also Like:
» The Ultimate Must-Have Travel Apps
» Why You Need Clear and TSA Precheck
» Long Haul Flight Essentials Packing Guide


The Airside Mobile Passport app online says Chicago ORD is an option to use it at, however Chicago does not appear in the menu of airports?
That’s odd? It should be included…?