

Bad editing can quickly turn a gorgeous photograph into garbage. And with editing programs offering countless tools at our fingertips, it’s easy to go a little nuts.
So just as important as knowing how to use these tools is knowing what photo editing mistakes to avoid. Here are ten of the most common, with examples of how they can ruin an image with a single keystroke.
1. Too Much Clarity
One of the easiest mistakes to make (and a personal pet-peeve) is dialing up the clarity to Spidey-vision levels. You want your audience to experience your work like a normal human being might see the world. Sure you can get creative and even a little arty, but you don’t want to make your images look ridiculously fake.
I’m not saying you should forgo the clarity edit completely. Used sparingly, it’s a wonderful tool for enhancing your photography. But it has its limits.
Don’t use clarity in an attempt to salvage an out of focus picture. Sorry friend, that ship has sailed. And if you have people in your photos, be especially careful! The clarity edit is the quickest way to make someone look extremely haggard.

2. Over-Saturation
Another common mistake is getting crazy with the saturation levels. Again, you want your images to be a realistic representation of the world around you and not a clip from the Sunday morning cartoons.
Similar to how the clarity edit brings back muted details, dialing up the saturation and vibrancy in an image can bring back hues that are lost (especially when shooting in raw). And it’s a great way to draw your audience in with an eye-catching image.
But much like everything else in life, it’s possible to have too much of a good thing.
To keep a photograph looking natural, I generally choose to boost the vibrance instead of saturation. This is especially important in images that feature people. With the vibrance slider, skin tones remain mostly unchanged while colors in the rest of the image pop. However, if you use the saturation slider you’ll be left with a subject that looks like they’ve spent a little too much time in the tanning booth.

3. Slanted Horizon
Unless intentional for the composition of your image, make sure your horizon is level. Otherwise, your photograph will appear lazy (and those of us with OCD will want to claw our eyes out).
Your audience should be marveling at your image, not tilting their head to view it.

4. Over-Smoothing Skin
I get it. We’d all love to turn back the clock to a time when the wrinkles weren’t so invasive and the freckles and sunspots weren’t mounting an ever more aggressive attack.
But using the brush to smooth your skin until you look like an anime character isn’t the way to do it.
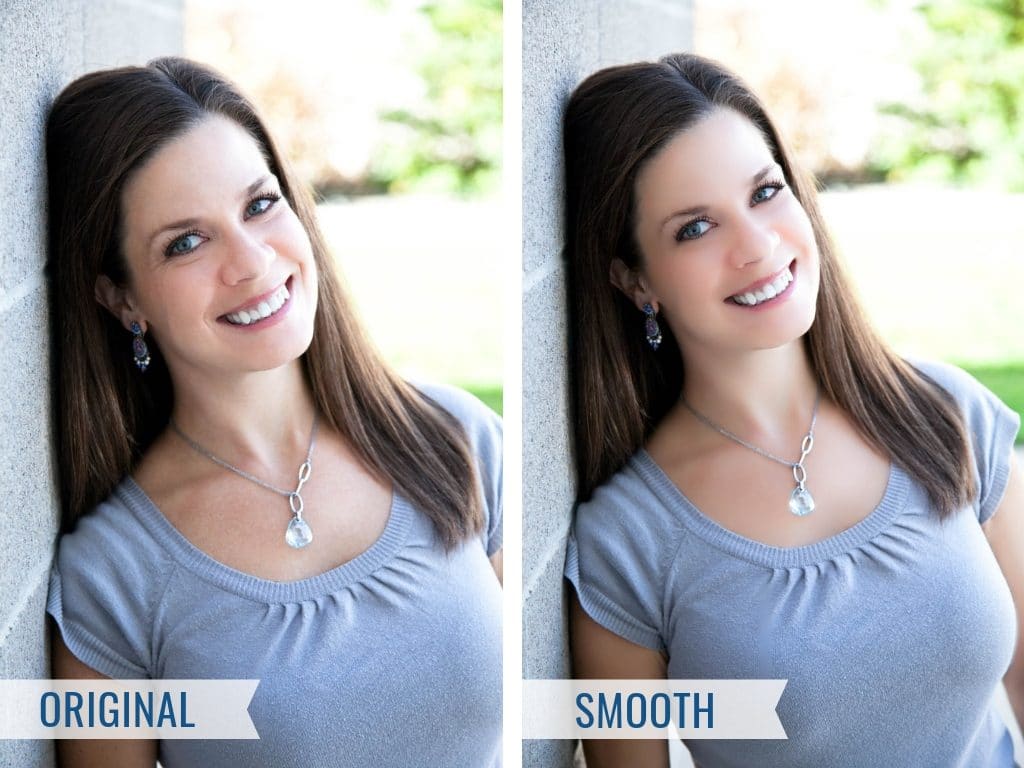
Like the other edits, you can use it sparingly to help. Removing a few small wrinkles here and there can look lovely. But when you overdo it you lose lines and shadows (which is really obvious, like when people go overboard with plastic surgery).
As you can see in the example below, the second photo makes it look like my eyes, mouth, and necklace are floating in a fuzzy tan blob. Not cute.
Avoid looking like you’re trying too hard. Shoot for flattering without being fake.
5. Over-Editing Eyes
It’s a common practice in portrait photography to brighten the whites of eyes. And while this can make your subject appear more pleasing to the eye (see what I did there?!), it can also make them look possessed.
If you remember Judge Doom at the end of Who Framed Roger Rabbit you know exactly what I’m talking about here. Do the world a favor and avoid making your subjects into evil villains.

6. Selective Color Is So Last Season
We’re all familiar with the trend to create a black and white photo with a pop of color. It was an arty way to draw attention to a subject, and soon swept the nation like the Macarena did back in the ’90s.
But all good things must come to an end.
It was fun while it lasted, but it’s now outdated and cliche. Time to move on.

7. Faux Bokeh
Bokeh (or the aesthetic quality of the out-of-focus areas in a photograph) can make an image appear more professional. And oftentimes photographers will pay top dollar for lenses that specialize in creating this effect.
But trying to contrive bokeh in editing is a mistake.
All you’ll end up with is an image that has blurry spots that appear anything but artistic.

8. Don’t Overdo It
If there’s a theme here it’s this – less is more!
There are countless edits available to enhance your photographs, but you don’t need to use them all at once (and you certainly don’t need to use them to the extreme!) Over-editing a photo can ruin the subtle beauty of its tone and composition.
Instead of implementing each tool with reckless abandon, exercise some self-control and use your edits sparingly.

9. Not Understanding Your Editing Program
It’s important to understand the abilities and limitations of your editing software. Knowing the difference between things like sweeping actions (such as increasing the exposure of your entire photograph) and selective actions (like edits available in the radial filter tool, or touching up specific colors) can really make a difference in how your image turns out.
There are a number of great classes out there, so if you need help learning the ins and outs of programs like Lightroom then sign up for one!
10. Deleting Your Originals
Finally, make sure you back up your original photos and not just the edits. Otherwise, it can be impossible to go back later and change the things you’ve done. As you become more adept at editing and develop your own style, you may hate your previous edits. And without an original to fall back on, you’re S.O.L.
If you’re editing in Lightroom it’s easy to revert your image back edit by edit. But even so, backups are never a bad idea!

A large part of the art in photography comes when you edit an image. It can mean the difference between a masterpiece and a forgettable doodle.
By avoiding these ten common photo editing mistakes, you can ensure your final images are just as incredible as the scenes you capture.
What are some of your photo editing tips and pet peeves? Comment below, I’d love to hear about them!

You May Also Like:
» Beginner’s Guide To Photo Editing In Lightroom
» The Basics Of Using A DSLR Camera
» 10 Tips For Better Photo Composition


To master the fundamentals of any editing program, you’ll need a great deal of practice. Make sure to get a thorough understanding of how editing works, if you want to produce great adjustments and make your photos glow with a professional zeal.