


When it comes to photo editing software, Lightroom is the industry standard. And, for good reason! The robust platform allows you to manipulate every possible aspect of an image until it’s a picture-perfect masterpiece.
But despite Lightroom’s intuitive design, there are still countless hidden gems within the software that help you edit more efficiently and with more control.
What are these hidden treasures, you ask? Well, here are a few of the best Lightroom tips and tricks that will forever change the way you edit your photographs.
1. Lens Corrections
The first place you should start when editing any photo is Lens Corrections. Doing so will help correct aberrations and distortions caused by the type of lens an image was shot with. This is especially important when using a wide-angle lens, which often curves the horizon.
Within the Lens Corrections drop down, click both the Remove Chromatic Aberration box and the Enable Profile Corrections box under Profile. Then choose the make and model of your lens and voila, Lightroom will take care of the rest!
If you’re still seeing chromatic aberrations (green or pink lines along the edges of objects like tree branches), use the Defringe slider under Manual to fix them yourself.

2. Auto Tone
The next step you should take with your photo is Auto Tone in the Basic menu. With this button, Lightroom will intelligently tweak your photo’s highlights, shadows, exposure, clarity, etc.
By no means should this be the end of your editing process, but it gives you a great jumping off point to make additional adjustments.

3. Shortcuts
Some of the best Lightroom tips and tricks are its secret shortcuts. Shortcuts can expedite your editing process immensely, as well as unlock some extremely handy features within Lightroom. These are a few of my favorites that I use with almost every image I edit. Get ready to have your socks blown off!
Command Z
Of all Lightroom tips and tricks, this is the one I use the most. Say you go a little nuts with the brush or hiccup while adjusting a slider. To quickly undo your last edit, simply hit Command Z. And just like that, you’re back in business!
L key
If you’re like me, you get easily distracted.
Squirrel!
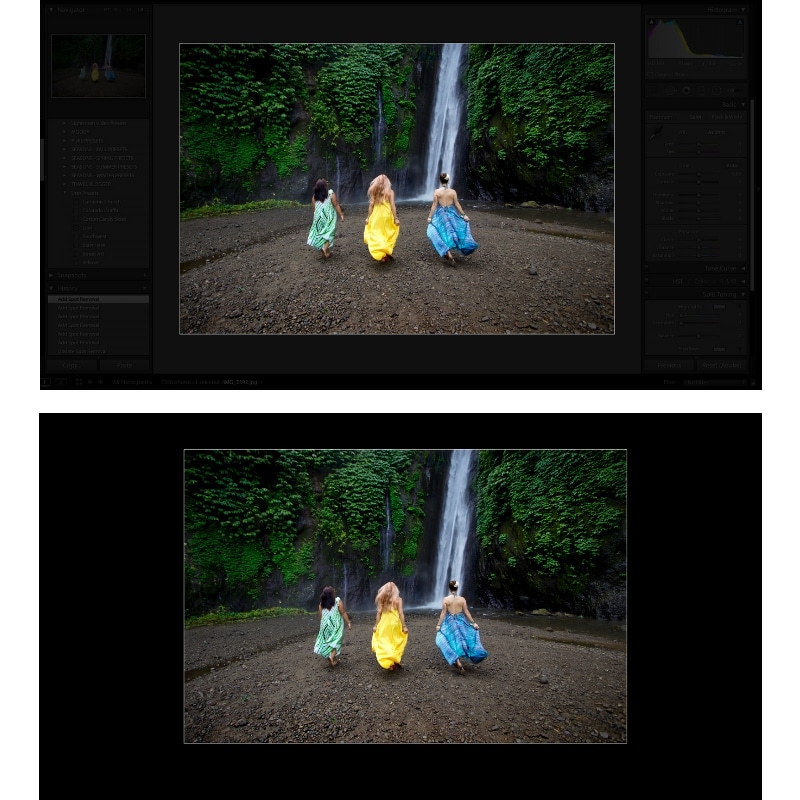
So if you find it hard to focus on your image with all the Lightroom menus around it, simply hit the L key. One click will darken the toolbars, and a second will show your image all by its lonesome.
And for even more customization, simply go to your Preferences in the Lightroom menu at the top and choose Interface. From there you can adjust the dimming percentages to your liking (the first image below is shown at 80%, the second at 100%).
\ key
Curious to see how far you’ve come from your original photograph? Simply hit the \ key to quickly view your original image! Doing so will not only let you marvel at your work, but also show you if you’ve over-processed the image and need to rein it in.
J key (or the Histogram Triangle)
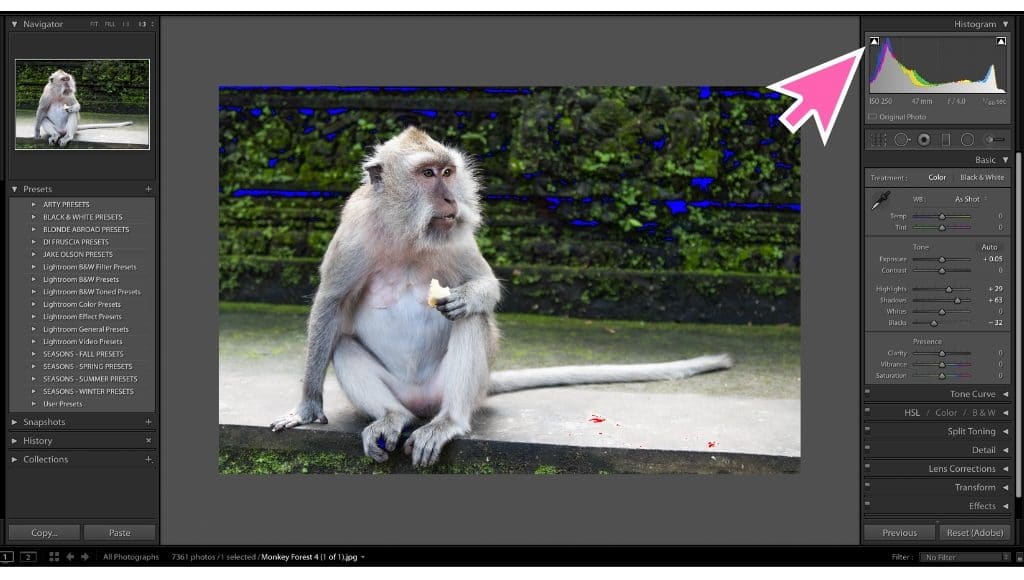
Clipping is when highlights or shadows in your image are too strong and data is lost. This can be extremely difficult to see with the naked eye, but not to worry – technology to the rescue!
Using the J key (or the pyramids in the upper corners of your Histogram), Lightroom will highlight any clippings within your image.
In this example, you can see the red areas indicating highlights are too strong near the monkey’s tail, and the blue areas in the background indicating the shadows are too dark. These are areas in the photo that are either completely white or completely black.
If you don’t see any, that means you’re in good shape!
Control Command + / keys
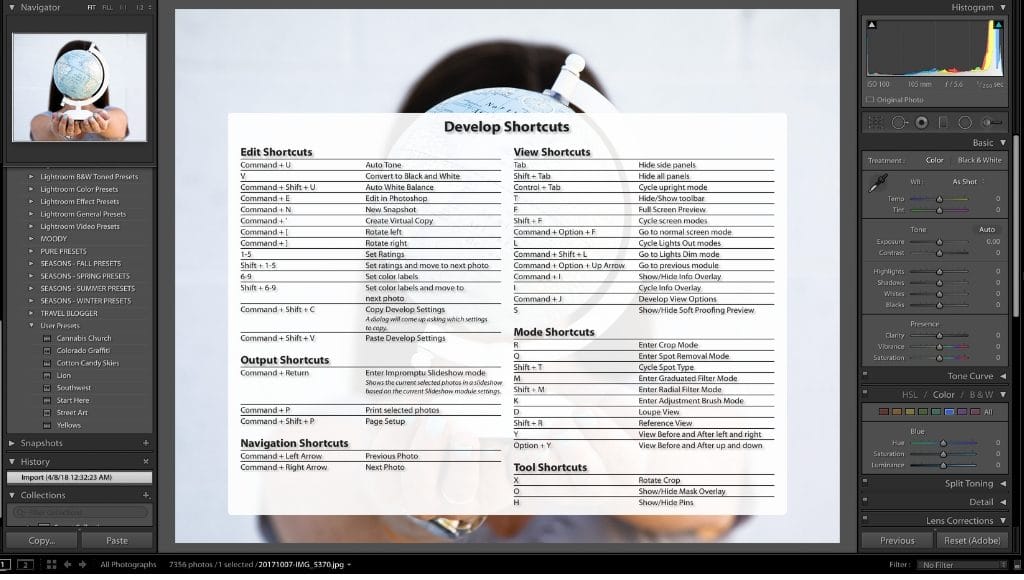
If you’re at a loss and want to see all available Lightroom tips and tricks within a particular screen, simply hit the four keys for Control Command + / at the same time for a full listing.
*Gasp*
I know, I know. You’re welcome.
4. Alt/Option Key Shortcuts
Think those shortcuts were awesome? Then wait till you hear about all the incredible things you can do with the Alt/Option key in various editing tools!
Within the Spot Edit Tool
Holding down Alt/Option key while in the spot edit tool turns the tool into scissors, so you can quickly delete previous spot edits.
Within the Brush Tool
Holding down the Alt/Option key within the brush tool allows you to easily erase previous brush edits you’ve made.
In Basic Edits Toolbar
Holding down the Alt/Option key and clicking the toggles for highlights, exposure, whites, and blacks will let you see if you’re losing detail within those sliders that are too hard to see with the naked eye.
5. Presets & Copying Image Settings
Now that you’re becoming a Lightroom expert, I’m sure you’ll develop some edits you absolutely love. And lucky for you, you can reuse them on other images in two simple ways – by creating a preset or by copying the image settings. And each is extremely easy to do.
Creating A General Preset
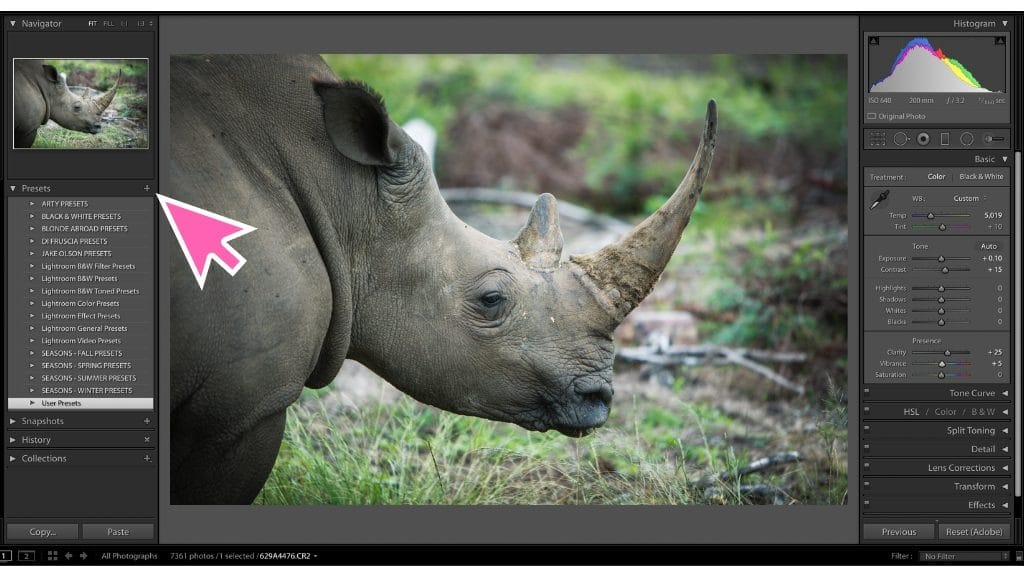
If you think you’ll use a particular edit frequently, I recommend creating a preset. To do so, simply hit the + button to the right of the Presets menu, then name your preset and specify which folder you’d like it to appear in. And just like that, you have yourself a preset!
To use it, just choose the photo you want it applied to within the Develop module. Then click on the preset from your Preset menu and the edits will be applied! Similar to Auto Tone, this will act more as a jumping off point than a final edit. But it will help expedite your workflow immensely.
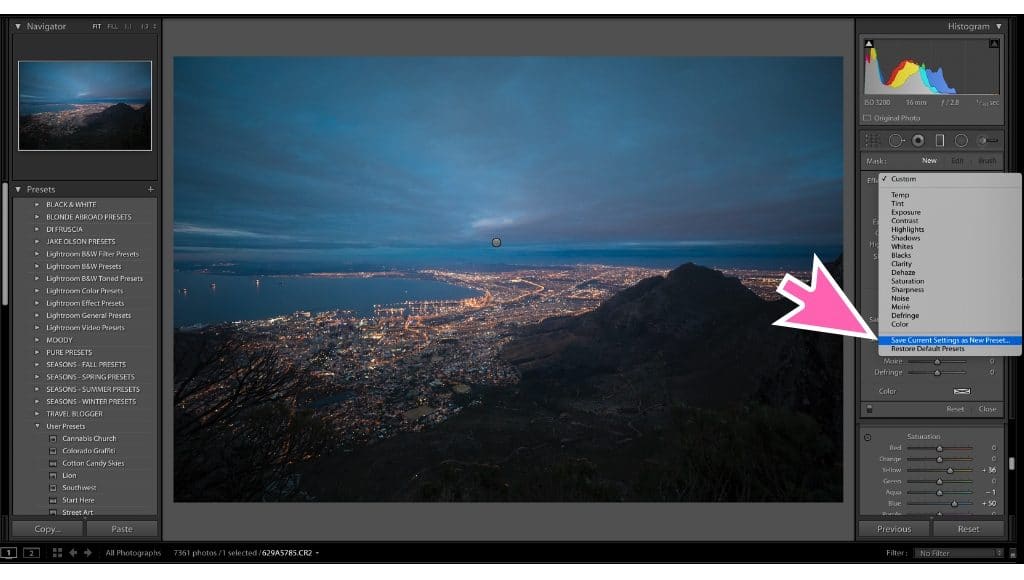
Creating Graduated Filter Presets
Similar to a general preset, you can create presets for the graduated filter as well. This comes in handy if you find yourself having to perform similar edits to certain areas of your photos (such as shooting the sky the same way).
To create a preset for faster edits in the future, simply go to your Graduated Filter tool. From there, click on the Custom menu (right above the Temperature and Tint sliders) and from the dropdown select Save Current Settings As New Preset. Then just tweak the settings between pictures, if need be.
Copying Image Settings
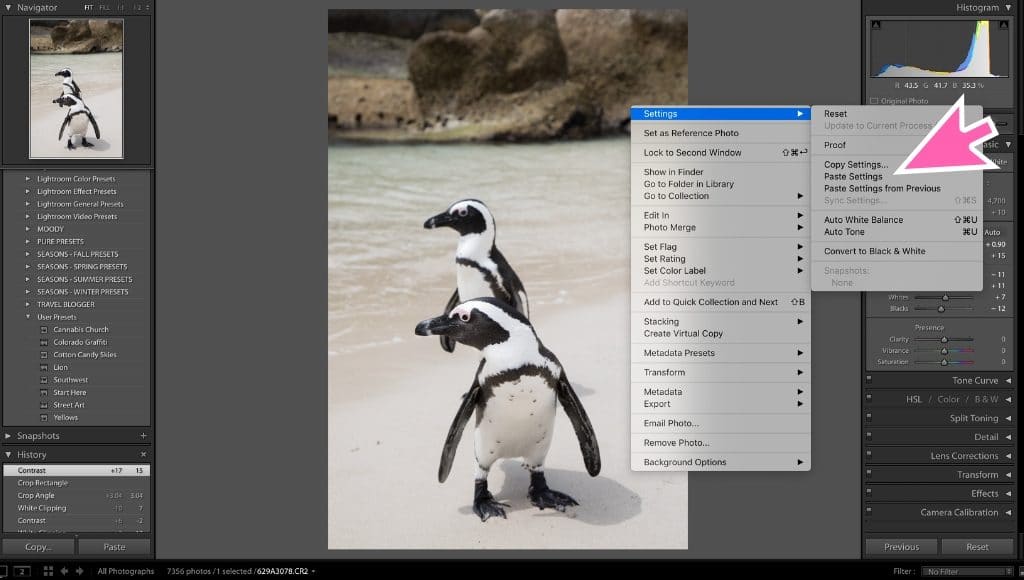
In order to copy particular settings to be used on another photo, simply right click on the image and choose Settings, then Copy Settings. From here, you can choose exactly what settings you want to use on another image. I recommend not checking the boxes for lens correction, spot removal, or cropping because they vary between images. But the rest should work well!
Next, go to the new image you want to edit and right click again. Then go to Settings, Copy Settings, and finally Paste Settings. Bada bing, bada boom! Your edits will now be applied to the new image.
6. Slider Tips
There are two main ways to edit an image – either with sliders or curves. There’s no right or wrong way, but I personally prefer the sliders. And there are a few tricks to them that will save you time and frustration when editing your images.
Resetting Sliders
To reset a slider back to neutral, just double click on the name of the slider (such as on the word “Exposure” or “Contrast”) and it will revert back to 0. Easy peasy!
Expanding Sliders
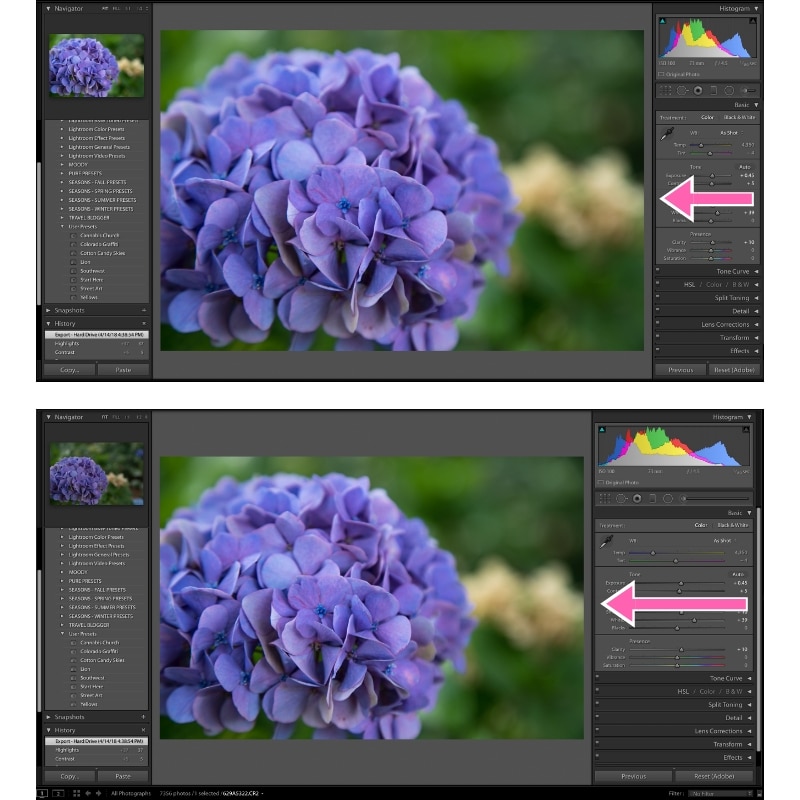
If you want to gain more control over the sliders, pull the toolbar to the left to expand it. By doing so, the sliders will become longer (making it easier to accomplish incremental changes). Another way to achieve this is clicking on the number to the right of the slider that shows what the slider is set at. This will create a box that allows you to type in a numerical value.
HSL Slider
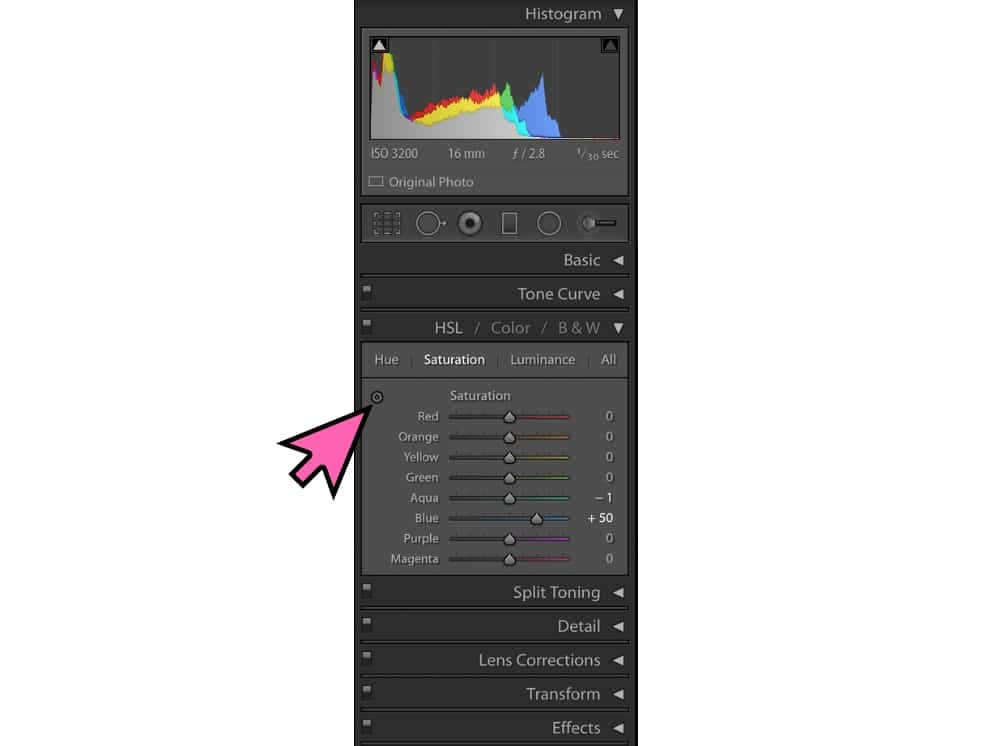
A handy tool when using the HSL sliders to adjust specific colors within your photo is the color picker button. This is great if you want to change the saturation of a specific area in your photo, but you’re not sure how Lightroom is reading it.
To access the tool go to your HSL sliders, then choose the little dot in the upper left-hand corner. That will add the color-picker tool to your mouse. After, just click on an area in your photo and while holding down the left mouse button, move your mouse up or down to increase or decrease the saturation of that color within your image.
7. Cropping Tips
There are several things you can do within the cropping tool to enhance your image and save you time. That’s why it’s probably one of my favorite (and most used) features within Lightroom.
Straightening Your Image
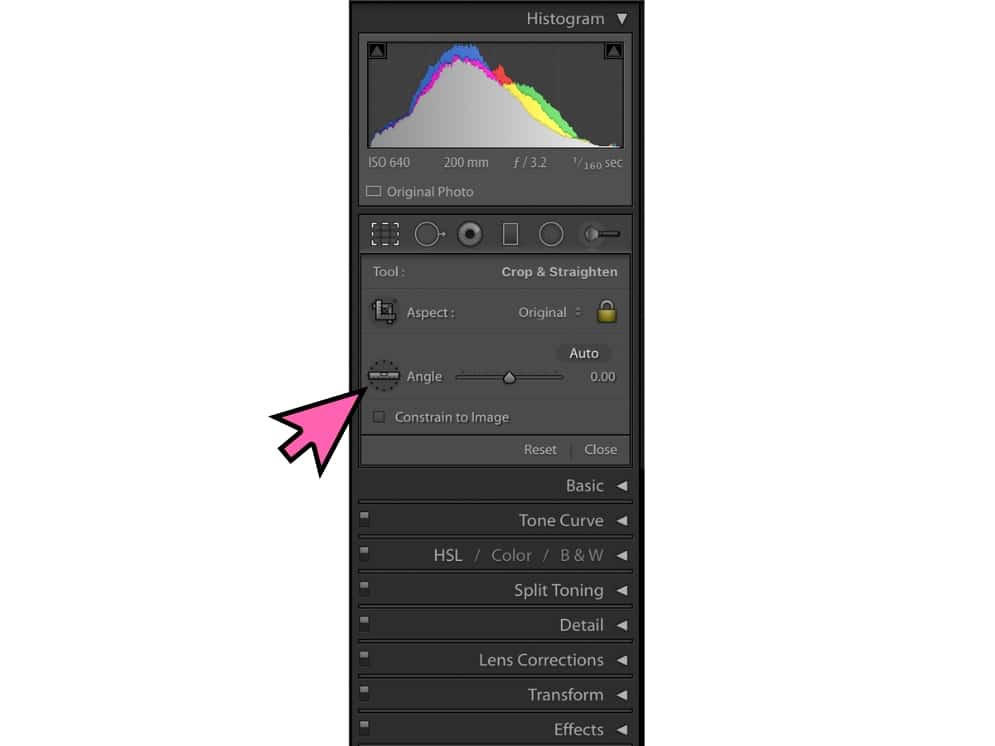
Within the cropping tool are two different ways to straighten your image. The quickest (and most accurate) is to use the level tool next to your Angle adjuster. When you click on it, you can create a line across the horizon (or whatever you’re leveling) from one point to another. This takes away the guesswork for a swift fix.
Guiding Lines
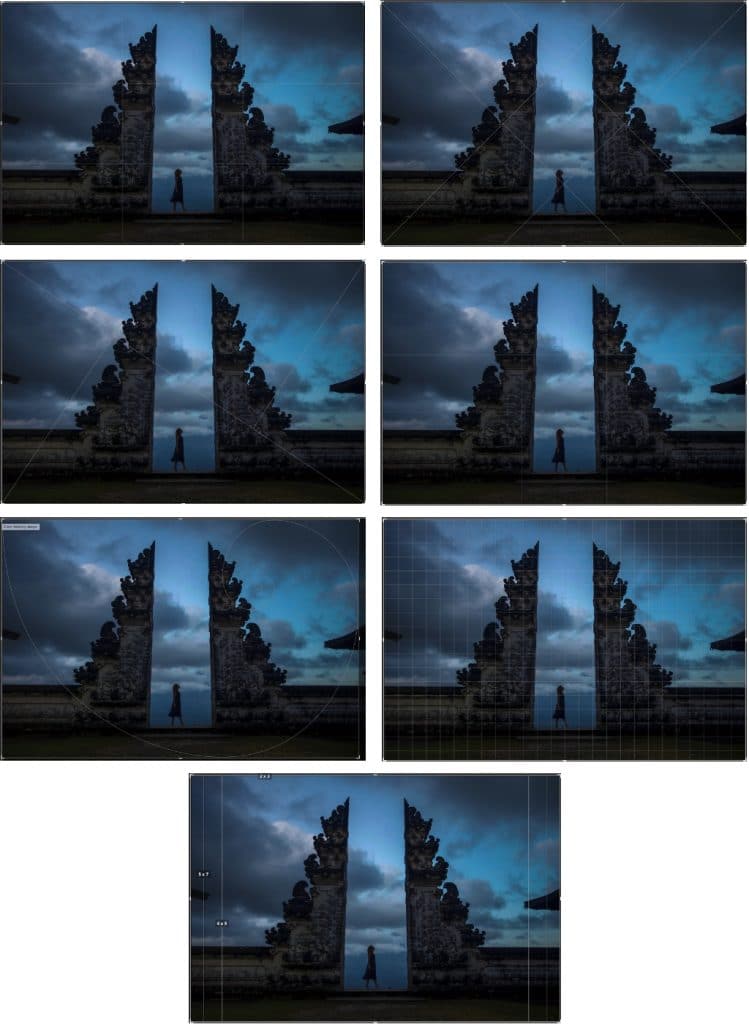
When using the cropping tool (which you can quickly access by simply hitting R), you can hit the O key and it will change the guiding lines from the standard rule of thirds to several other options. This is an easy way to get creative with your composition. And if you’re using the golden spiral overlay, by hitting Shift O you can cycle through flipping it in different directions for even more options!
Using these Lightroom tips and tricks you can breeze through an edit in minutes! And with all that free time, you can find even more hidden nuggets to further enhance the way you process your images.
What are some of your favorite Lightroom tricks? Comment below, I’d love to hear about them!

You May Also Like:
» A Beginner’s Guide To Photo Editing In Lightroom
» Common Photo Editing Mistakes To Avoid
» 10 Tips For Better Photo Composition



Leave a Reply